


Sean
-
Content Count
37 -
Joined
-
Last visited
Posts posted by Sean
-
-
Here's a tip for working with casting epoxy: hair-dryer.
The heat causes the air in the bubbles to expand and they will rise to the surface and pop. My buddy and I used to use lighters to achieve the same effect (but for flat cast items).
For something like that, use a hair dryer instead.
On the note of the mould, go get mould release wax (should be available from art friends too). Then the epoxy won't stick to the mould and you won't need to clean residues off with spirit.
Thanks for the hairdyer tip. Yeah I know about mold release but wasn't able to get it at art friend. Maybe they ran out. But I checked on youtube that it was an optional item so I just went ahead without that. It came off very very cleanly and I'm sure I can use the mold I made many many times.
Seriously, my bluetooth headset is very comfortable now. Always felt as it is was falling off before. Now it sits in my ear canal very comfortably and securely.
-
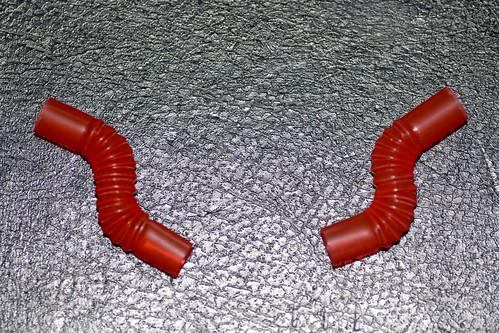
OK.. update
I spent some time in the afternoon with a drill and rotary tool to enlarge the holes at the back of the shells I made
For those canal based phones like Shure E2C and Ety ER6i, I have yet to achieve satisfactory results. I will need to think a little further about channeling the sound correctly.
BUT
I had great success with those traditional earbuds ie the standard ones that we get with iPods
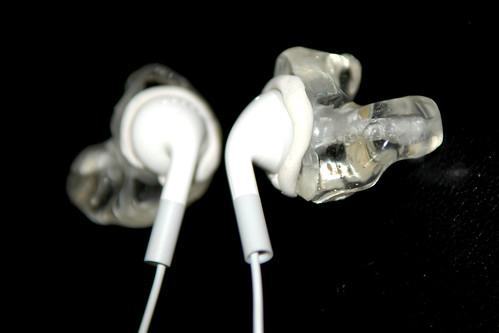
The sound was excellent with great, balanced delivery of highs and lows. And the added comfort and isolation just brings it to a whole new level. I may need to find a more elegant method of securing it to the shells. As you can see in the pic above, I'm only using bluetack. But that can be solved later.
I then attached one of the shells to my Jawbone Icon.
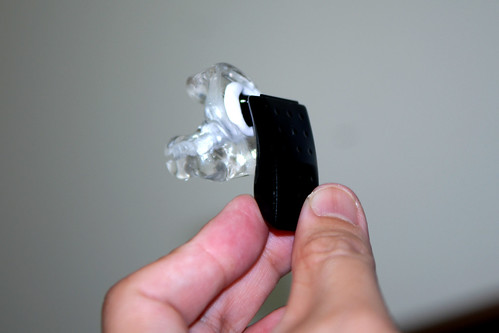
I've created the most comfortable bluetooth headset ever! I even tried streaming music (via the Jawbone's A2DP ability) from my iPhone. The music came through great with the right amount of volume. Can't expect much in terms of quality from a bluetooth headset.
The next nut to crack will be to get my IEMs working with this!!
-
I have been wanting to create my own custom shells for sometime now using material that is available to us here in Singapore. My aim is to create a shell for my other lower end IEMs like the Shure E2C and Ety ER 6i. I also would like to make my own custom shells for the my bluetooth headsets.
I've posted my initial experiments here before with Epoxy Putty and then with Silicone Putty.
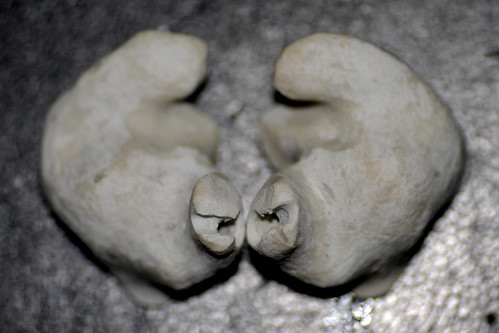
Having recently reshelled my Shure SE530 with Unique Melody (via Stereo Electronics), I attempted here to create a mold and then cast it with epoxy.
Molding material: EasyMold Silicone Rubber
Casting material: EasyCast Clear Casting Epoxy.
Both are available at ArtFriend Bras Basah.
I won't go through the prep of these materials as they are well described on the manal and also on Youtube. (just do a search). But you will need measuring cups, syringe, rubbing alcohol and wax paper.
Molding
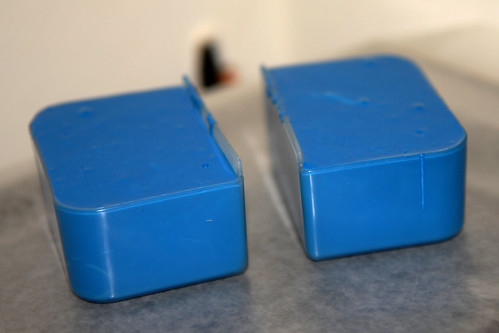
I prepared 2 plastic containers. Doesn't matter what type as long as not made of rubber or silicone. The material is food safe so you can use tupperware as well.
I blocked out the holes with sticky tape - something I regretted doing. You should try using tape with a smoother surface like electric tape. You will see why in the other pics.
I stuck the base of the shells with bluetack at the bottom of the container and then poured the mixture over it. While pouring, to avoid air bubbles, ensure you pour it from 30cm height and let it stream to the sides of the object so that nothing gets left out along the way.
Left it alone for 24 hours.
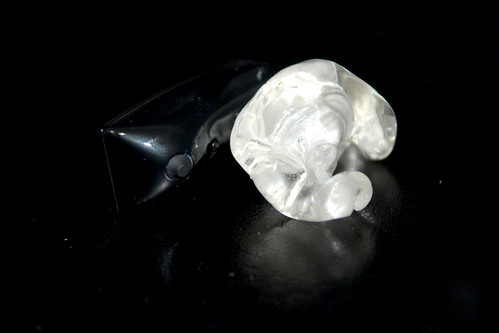
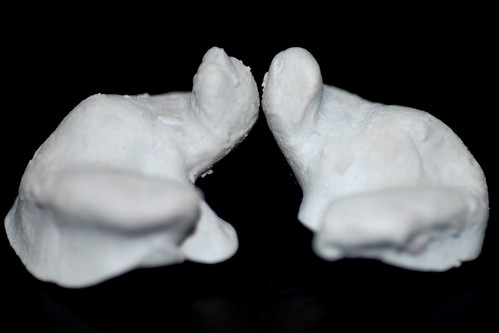
Demolding
Simple matter of easing out the original shells. It was a very clean process. Nothing was left stuck to the original piece.
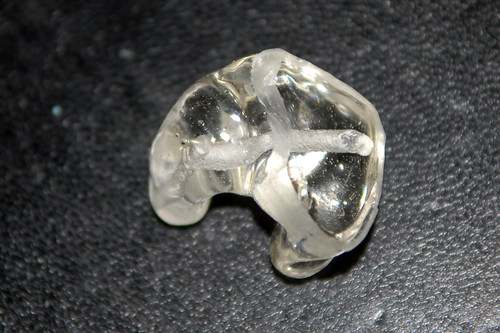
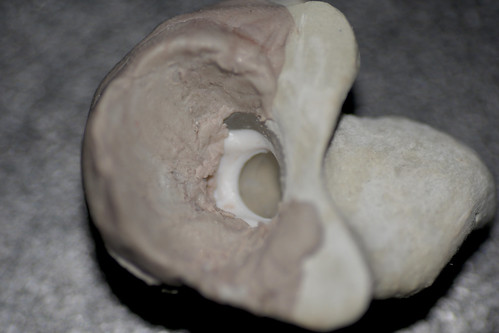
You can see in the pic below I have marked a spot with X. That is where the surface was unsmooth due to the sticky tape I put on to protect the holes of the original piece.
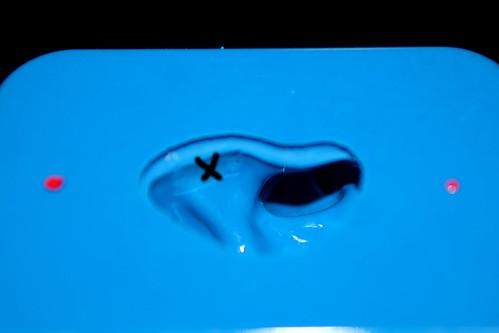
Red spot painted for my own reference.. this is the right side.
This mold can be re used many times.
Casting
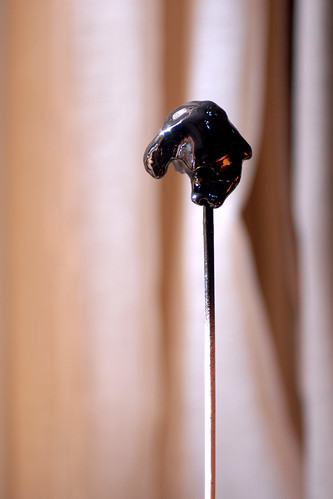
Mixed up EasyCast clear casting epoxy, following the instructions carefully. I suggest if you are doing this to also look up how people are doing it on youtube. Used a syringe to slowly inject the casting material into the mold. Very important to be slow to avoid excessive air bubbles. I didn't give the mixture enough time to degas and hence you will see quite a few air bubbles trapped in the pics later. This must be left alone for 24 hours or more. It has to be given enough time to harden or it will be ruined when you remove it from the mold.
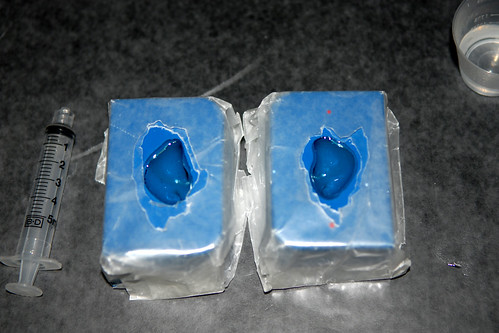
You can buy the mixing cups from ArtFriend and the syringe from any pharmacy like Guardian. Wax paper is bought from any supermarket. Go to the section where they sell aluminium foil and clingfilm. If you want to reuse the mixing cups and syringe, buy some rubbing alcohol from the pharmacist to clean the material away.
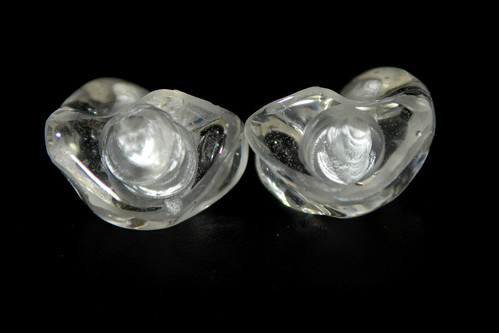
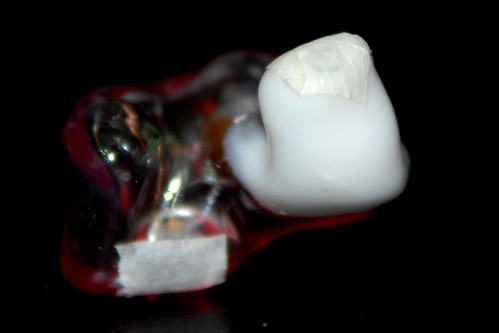
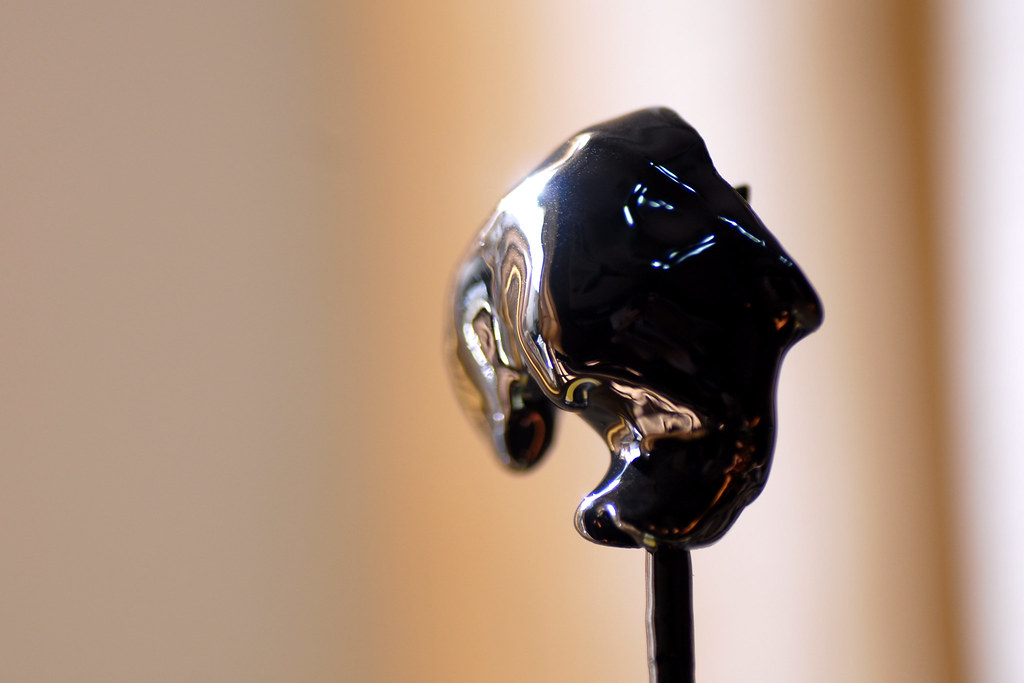
THE RESULT!!
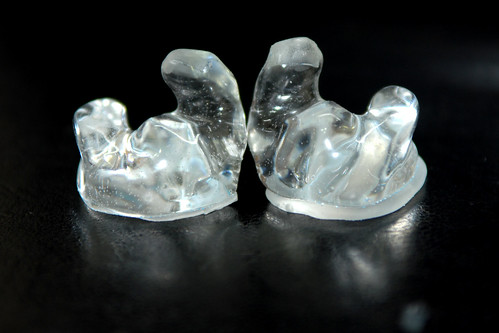
Seeing this after experimenting and waiting for so long, it truly was a thing of beauty for me. Had to use a rotary tool or file to remove excess bits here and there. When I put it into my ears, it felt excatly the same as the originals. And the isolation levels and comfort were excellent. They were the perfect - earplugs - at this stage.
Drilling
This is the most challenging part which I have not got right yet.
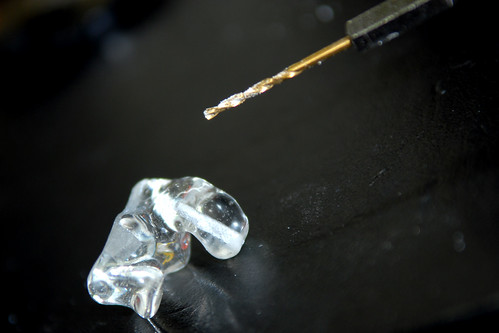
Got the drillbit from Daiso. It attaches to an electric screwdriver and allowed me to have greate control as the drilling went on. I started with a 2mm and then graduated slowly to 4mm. The trickest part is that I had to drill from both ends since there was a curve. And that created a sharp angle inside the shell. Once this was done, I attached my Shure E2C to the shell with bluetack and was not very happy with the sound. Too soft because it was too far away and the sound had to travel further. I had to put the volume quite high to get any decent sound. But it was damn comfortable.
Had to be careful during the drilling as I didn't want to make any holes elsewhere. My next attempt will be to drill further into the shell and make a straight canal instead to shorten the distance that the sound has to travel.
THE ADVENTURE CONTINUES...
-
Well done bro!! Great thing about this is that if you don't like it, throw it away!
Just keep trying until you get what you want. It may take a few tries but don't give up. It takes a bit of practice.
-
Great work and cool results.
Am thinking now of trying it over this long weekend

Go for it and best of luck. Do share your experience here as well.
-
do you have a link to where i can send mien for reshelling too? the cable insulation of one side just gave way as usual and since its out of warranty plus a not very "nice' local agent so i'm thinking of options other than going customs
Sorry have not been logging in. Too busy enjoying my 'new' headphones hahaha.
I got mine done at Stereo at Plaza Sing. They will settle everything for you. I'm still waiting for my reshelled phones to come. That's why I embarked on this DIY project.
Do it man, document it and then we can copy idea!

The art supply shop in Bras basah does sell material to cast the mold. So this is indeed possible. You can use the silicone putty to create the the mold over the customer shell, and then pour the casting material into the mold. You can choose from either rubbery material or resin.
But I'm still waiting for my shells to come :-( Anyway, I will try it when I have time. I still feel that just sticking silicone putty in your ears is a great solution already. An I found a way way of drilling through the putty too. So no need to wrap it around straws. Just stuff it and drill when its hardened. You need an engraving bit attached to a rotary tool to create the channel for the sound to flow.
I also had some success with the ipod earphones (the white ones). Use the silicone to create a better seal and WOW!! Seriously, I didn't know how much joy a half pound of silicone putty could bring. Hahahaha.
If you are still unsure, just try putting bluetack in your ear. It feels like the same thing. But always take precautions!! Foreign objects in your ear must be taken with great care! Please don't hold me responsible for any accidents. You have to do this responsibly and carefully.
-
Thanks guys. I think what's important is that it is possible to do these things with the materials made avialable to us here in Singapore. We just need to find it. A visit at Art Friend Bras Basah opened up so many possibilities for me and I was just totally inspired.
I'm missing my Shure SE530. Its gone to China to get reshelled and I don't know when I will see it again :-(
At least these project will keep me happy till it comes home..
-
I HAVE FOUND IT!! THE ULTIMATE SOLUTION
Was at Art Friend today at Bras Basah and found this. Paid about 28 bucks for this. They had a larger one but you only need this. It enough to make about 20 I think!
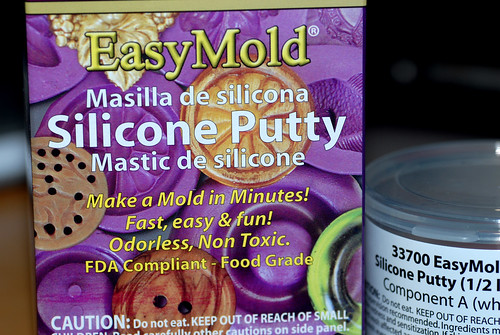
Its safe
Its odourless ( I tried very hard to smell it but just can't pick up anything)
Its (relatively) cheap
Its non toxic, even food friendly
It is perfect for what I'm looking for and it provides an amazing seal
Now I can take all my epoxy putty plugs and throw away! The silicone plugs are far superior and a lot less hassle to make.
I was experimenting with bendy straws to make the channels in the plug and was successful in making plugs for my Sennheisers (no pic of my Senns)
It is not easy to drill through rubbery material like this. You won't get a clean channel. That's why I used the straw. You can try it with other objects like a thick wire or something.
It takes a bit of fiddling around but got it just right in the end. After kneading the material, I roll it around the straw and insert that into my ear, pushing the material into my ears and then into the cup and around my ear.
When the silicone is cured (3-5 minutes) you can use a pair of pliers and pull out the straw. It will come out cleanly. The hole left by the straw is just big enough for my Senns! Its a wonderful fit.
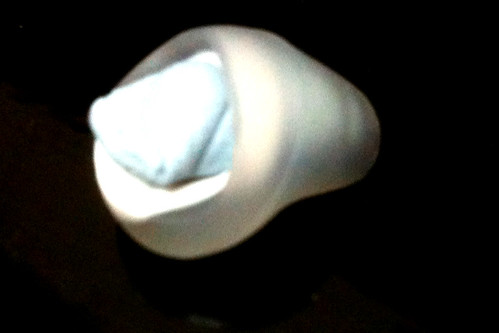
Picture above is right now the highlight of the day for me. Shure E2C encased in silicone putty. The kind of sound I'm registering is simply amazing. You know how when you listen to earphones and if you pressed it to your ear in a certain angle it sounds great? Well, I'm getting that with this solution. It just makes the earphone a lot better.
One thing bad about this - It doesn't LOOK good. You can see folds here and there and imperfections unlike the epoxy putty plugs where I can just gloss those imperfections over with paint.
It really looks like I stuffed bubblegum into my ears. In this case grape flavoured.. yummy.
OK I'm off to enjoy my headphones. Later!
-
Wow, fantastic DIY. Was thinking of doing this but couldn't figure out what material to use. Great idea to use the epoxy. With the glossy paint, it looks just like the professional customs.
Gotta try this when I have the time.
Thanks. Do try but be cautious. Remember that there are risks involved like bits faliing into your ear drums. Can cause infections etc.
There is. No need to stick it too far in as well since isolation is achieved by having the material cover the outer ear as well.
very very nice work. interesting stuff. seems damn professional man! what if instead of those putty u use, use some silicon? and if u do succeed, may i request for you to do it for me? for my westone 3s.
 i'm only a sec 4 kddo with no time nor tools nor cash to spare. so this is gonna be the most economic solution for me.
I'm interested in silicone but have yet to find the right material to use. Must head to the art supplies store to check what's available.
I'm not a qualified audiologist and won't dare take the risk of doing it for you. It's better that you make the decision to do it yourself. I will post my findings here once I check the silicone option. The seal is better.
I am not too happy about painting it as the smell is quite strong. But it does improve isolation so no choice.
-
Missing my Shure phones (sent for reshelling) I decided to improve on my Bose On Ear headphones. This DIY is inspired by the link below:
http://cre.ations.net/creation/creat...ear-headphones
I've always liked the unique (albeit slightly crappy) sound from my Bose earphone but totally hated how they kept falling off.
The epoxy putty I used can be bought at any hardware store (ie Self Fix) in Singapore. Its called Selleys Knead It. I get about 4 to 5 tries with one tube. Each costs only SGD5.50 so it leaves a lot of room for trial and error.
If you are going to try this yourself please do note that I won't be held responsible for anything that may go wrong. Some things to look out for:
1) Allergy. Do test with a small piece of the putty first.
2) Heat. As it sets, there will be some of it but not unbearably hot. It is tolerable. Just expect it.
3) Hair in your ear canal. I don't have this problem but if you do, line your ear canal with some vaseline first.
Always clean your ear canal to ensure it is free of dirt and excessive wax.
Preparation
The Bose On Ear Phones come with multiple adaptors. I used the smallest one (ie the one that I don't need since it doesn't fit).
Stuffed the hole with some bluetack to ensure that the openning doesn't cave in.
Prepare a biting block of about 3/4 to 1 inch tick. Have tissues ready in case you slobber.
I use a pen knife to cut 2cm section, remove the wrapper and wet my hands a bit and start to knead. It will change into a light grey colour. At this point, you have about 3 to 4 minutes before it sets so you need to be
quick. But don't worry. If it doesn't work out, just do another. Its relatively cheap to cock up.
While biting on the biting block, I shaped the putty into a thin rod and started inserting the tip of the rod into my ear canal. Pushed it in until I couldn't hear well with that ear. Then I stuffed the rest into the cup of my ear ensuring that I got a good seal. Before it sets, I quickly took one of the plugs and buried that into the putty in the correct position. The putty will become warm for 2 to 3 minutes and that is when you know the setting has begun. After 6 minutes, I gently removed the hardened putty from my ears ensuring that I didn't apply too much force to remove it. It helps to twist it slightly to the front to remove it.

You can see the adaptor buried in the putty/plug.
I then did the other side (if you are doing this yourself, it is important to do one ear at a time) and let the pieces dry overnight.
The pieces look and felt like dried bones the next day. I used a grinder attached to a rotary tool to smoothen the surface. At this point, I took a pair of tweezers to remove the silicone adaptor and started drilling with a 3mm diameter drill bit from the other side (the side where the sound is supposed to be coming out). This was a pretty tricky part as I had to ensure that I get a good straight line along the canal straight through to the opening on the other side. You can see from the previous image that my ear canal slightly bends. I used the rotary tool to grind a channel from the hole so that sound can still flow all the way through the bend.
I then cut the tip of the silicone adaptor and put it back into the hole. I had to cut it because the hole created from drilling will not align so nicely with the tip of the adaptor. Without doing this, the silicone will impede the sound from going through the channel I drilled. So I snipped off a fair bit and stuffed it back into the plugs. Afterall, I'm only using the adaptor to ensure I get a good seal with the headphones.
I then added more putty and while having the earphone protected by clingfilm, I stuck it into the plug.

This allowed the headphone to sit nicely into the plug. Some grinding with the rotary tool was required to smoothen the surface. At this point, I did a sound test and was more than satisfied with the comfort level and the sound quality. Obviously I'm not expecting the same kind of performance that a triple driver brings but these plugs improved the comfort level and isolation and basically allowed the product to shine. I was
registering punchier bass (but a bit muddled - expected from before). Mids and highs were pretty well defined.
Painting
I used Nippon spray paint - Glossy Black and Clear (about SGD5 each can). Applied 2 coats of black and 2 coats of clear allowing each layer to dry properly.
Used a stick to hold each plug.
A closer look.
Isolation improved a lot more after this because the clear paint stuck on to skin a lot better I guess. Some people online used wax.

Sits in my ear so perfectly!!

It does look a bit large but most of it goes into my ear.
Overall I'm very happy with the results especailly with the sound. Also I don't feel as if the headphones will fall off. I kept getting that before. Best of all, it was so damn cheap!!
But you do need tools to help you along like a drill and a rotary tool.
-
Hey guys, we can now create our own custom fit headphones. Check this out
http://www.telegraph.co.uk/technology/news...-Sellotape.html
-
I did some quick calculations and figured that the twin batteries of the Viper actually provided more power than 6 AAA batteries so I picked up the Viper.
Currently burning it in with ISL55002/THS4032.
You're here as well.. just saw you on ClubSnap haahaa
-
Alvin,
I want to change the LED to a different colour. Do you know the kind I should get? What's the recommended power rating?
Sean.
-
Anybody want to test can PM me.
-
Yeah. Think I won't mod mine since I'm very happy with mine. (both of them!)
The SQ of the Mini3 is almost comparable to the Hornet, especially after 30 hours burn in time.
-
hm.. hand itchy again, and i'm too free during this long vacation

modded my mini^3

removed 2x 100u25v FM, 2x 470u16v FM, 6x 0.1u
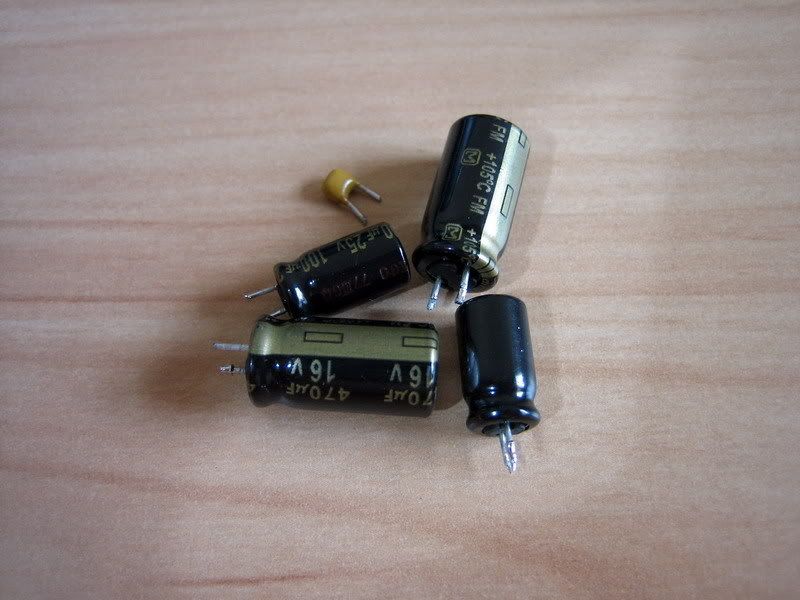
modded with 2x 47u25v Cerefine, 2x 470u25v Made in Germany Frako, 6x Wima Black Box
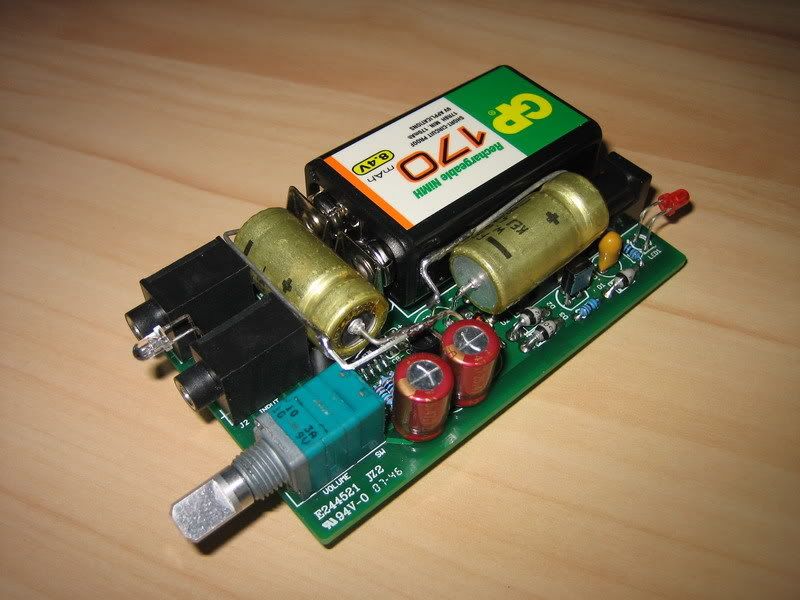
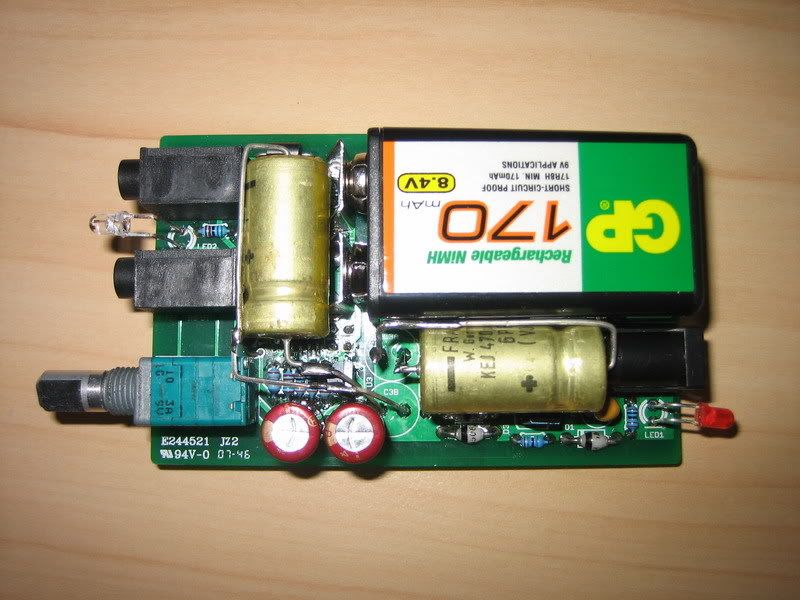
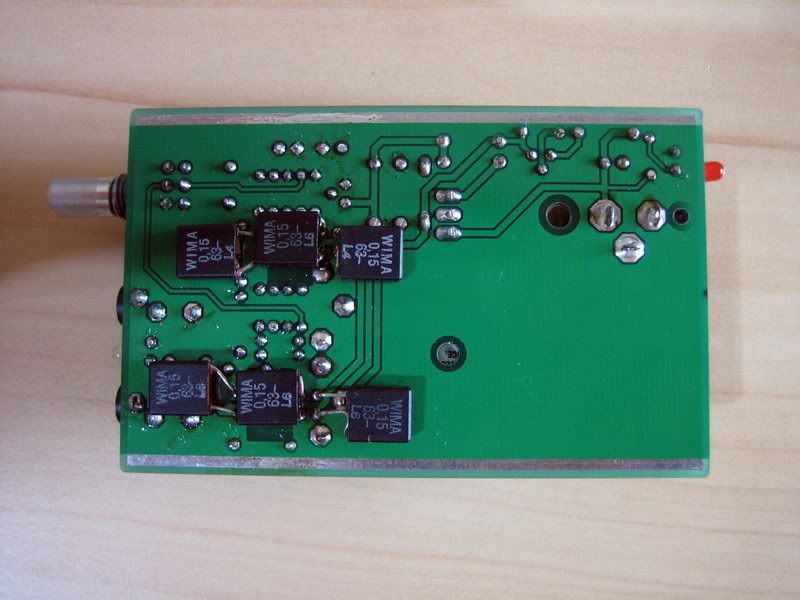
it sounds better indeed! better sound stage and musical!
burning in now to find out more

sweet!! tempted to try.. does it still fit in the case?
-
Got mine for 299. Its the version that does opamp rolling but I'me pretty happy with the opamps it came with.
-
I tried the Predator, Pico, iQube and iBasso D2 Viper. My personal feeling is that the Pico and iQube sounds far richer than the Preddy. I also found the Preddy to hiss quite a lot too.
I did hear that it improves a lot over time but just listening to the rest in the list, I found that the iBasso D2 was the most value for money, especially the version that does opamp rolling.
If money is not a problem, I'd get the iQube or Pico - close fight. But since I have budget and don't have golden ears, the D2 was extremely satisfying.
-
just finished debugging & repaired a friend's mini3..sorry for keeping the mini3 with me for so so so so long. i hate exam! lol
problems are as follow:
- Left side no sound
- HIGH Voltage Output at Left Channel
 no sound no sound!!
alright, last try is to change the OPA AD8397! mini3 is well known in burning OPA. lol
SOIC OPA not easy to de-solder without proper smd remover tools..traditional method is to apply huge amount of solder on top and bottom of the SOIC, and "try" to remove it by heating up the solder...hm..i'm not good in describing, just REMOVE IT!! wahaha

after changing the OPA, measure OR-OL-OG to Gnd, all within recommended range. plug in my senn earbud with mp3 input~~~
wow~~it works wonder now!!!
This must be referring to my set
I'm enjoying it now. Really happy with it and thanks a lot for helping me trouble shoot. I suspected it was the OPA but didn't dare to remove it (after you know what happened heeheehee) I'm still quite amazed that you managed to remove the OPA without any SMT removal kit. Good stuff.
I think the OPA must have got burnt when I tried to mount the battery plates. Mounted the plates to the rechargeable battery and then soldered the plates in place. This was advised by the website to get a good fit. But they mentioned that the battery should not have anymore charge. I thought the rechargable battery being new would not have any charge. Looks like I was wrong..
Anyway, thanks again. And do let me know when the other set is available.
-
OK. Had the chance to test the virtual ground today with the TLE2426. At first when I turned it on, I was very surprised to find that the hissing is a LOT less. Sound was improved ..
BUT...
The TLE2426 was running very, very hot. When I touched it, it burned my fingers! So I turned it off. After it cooled, I turned it on again and the sound was very, very badly distorted already.
I had another TLE2426 and I replaced it. Same thing. At first the sound was very good but it heated up very badly. Don't know what's causing it. I used the 220uF cap, 25V in parallel with it.
Now I'm back to the original power supply. Hissing sounds like the sea man :-( Going to try to lower the gain with 90kOhm resistor instead.
-
I recently bought SE530 earphones to pair with my ipod. Though most of my music was encoded at 320 kbps, I felt that the increase in sound quality is not much. This is partly attributed to the poor sound quality of my 4th gen ipod headphone out. Later, I have added a headphone amp to the setup and now I feel OK with the SQ though not spectacular.
Should try encoding with ALAC format. (Apples Lossless). Less distortion heard. The Shure SE530 is too good.. it picks out poor encoding too, especially for violin solos.
-
Hi All,
To clarify:
The AMB Lab Mini3 Kit set i have got is from a Taiwan friend, who is the authorized distributor of AMB product in Taiwan.
The different between V2.0 and V2.1 is described in AMB Lab Mini3
"October 3, 2007: All new Mini³ boards shipped are now version 2.01. This version corrects the reversed left and right channel silkscreen labels in v2.00."
Design wise it is still the same as V2.0, just the label correction

Hope it clear some doubts.
Regards,
Alvin
I'm very interested in building my own Mini3. Is there a place I can get all the parts in Singapore?
-
ha same here enjoying mine. thinking of replacing the buds with those shure foam tips.. not sure if they fit though
Tried before. Could not fit. Anyway even when the isolation isn't great, the Bose tips are the most comfortable pair of headphones I have.
-
Hmm. Your power supply only that one 0.1uF cap? For power, you can place a good electrolytic cap 470uF in parallel to that cap.
For the hiss, I think you are using IEMs or sensitive headphones? You can try lower the gain. But the better idea is to build something better. A CMOY is only an exercise in learning to diy and to whet the appetite for bigger things to come.
Try building a Mini3.
My power supply has the 330uF electrolytic Caps already. Not just the 0.1uF caps. Maybe I will try getting a good electrolytic cap from Burlington Sq.
I'm using IEMs - Shure SE530. I am interested in the Mini3. Where do I get schematics for that? Will be an interesting project..
DIY - Custom Fit Adaptors for In/On Ear Phones - Updated!
in DIY Section
Posted · Report reply
The new Jawbone Icon doesn't need contact so it works great. The older one, yes. And I have it too. But I stuck silicone putty to 'extend' the reach of the sensor. Not very nice looking but functional.