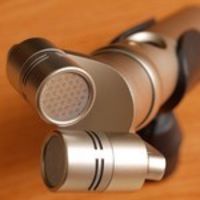
bpribadi 0 Report post Posted November 1, 2004 (edited) Here is my method to make the small SOIC8 IC mountable on the DIP8 socket. 1. I don't like this part, cutting the perf. board, 4x4 holes. Use acrylic cutter to cut the board, and I use sharpening stone to smoothen the edges. 2. Remove 2 rows of the copper with pen knive. Not difficult. 3. Put all the pins on the DIP8 socket, and mount the board. 4. Bend and cut the pins accordingly. 5. Flatten and bend the four legs on the corners. 6. Clamp the IC and the board with Visegrip, and solder the legs. 7. Done. The Op-Amp with the adaptor removed from the DIP8 socket. Edited November 1, 2004 by bpribadi Share this post Link to post Share on other sites
jtfoo 0 Report post Posted November 1, 2004 Good work Bram.. This is going to save us some money, instead of getting the browndog. Share this post Link to post Share on other sites
aaa 0 Report post Posted November 1, 2004 Very useful info. But the last photo is not the right one. Share this post Link to post Share on other sites
bpribadi 0 Report post Posted November 1, 2004 (edited) But the last photo is not the right one. ??? ??? Don't understand ??? Do you mean because you don't see the DIP8 socket? It is the final product without the DIP8 socket. The DIP8 socket is just to help to hold the pins. Can be remove when done. Edited November 1, 2004 by bpribadi Share this post Link to post Share on other sites
digi01 0 Report post Posted November 1, 2004 very useful bram,thank you for your sharing cheers Share this post Link to post Share on other sites
aaa 0 Report post Posted November 1, 2004 Never thought of reusing the socket... your method has near zero cost!!! Share this post Link to post Share on other sites
tropicalrips 0 Report post Posted November 1, 2004 Bram, which type of pins do u use? i can't get the pins to fit into the dip8 holder or isit my dip8 holder has a different size hole Share this post Link to post Share on other sites
bpribadi 0 Report post Posted November 2, 2004 Hi tropical, I bought the pins in a small plastic pack in SLT 3rd floor, the shop at the left side of Kaichin (after the escelator). SGD 1$ for one small pack, which I think enough to make more than 20 adapters. I saw only 2 sizes of pin, I took the small one Share this post Link to post Share on other sites
tropicalrips 0 Report post Posted November 12, 2004 (edited) attempted Bram's method of making the adpator today it was harder then i thought bought the pins from SLT Sunlight 3th floor, i think the trick is to do the 4 center pins first, then adjust the 4 outer pins. here's the result the op-amp is a MAX4167 (sample) Bram, did u use some kind of studio lighting to take your shots? they look really good Edited November 12, 2004 by tropicalrips Share this post Link to post Share on other sites
bpribadi 0 Report post Posted November 13, 2004 Well done Tropical! How's the MAX sounds? No studio lighting, just bounce the flash to the ceiling Share this post Link to post Share on other sites
tropicalrips 0 Report post Posted November 13, 2004 thanks the MAX chip sounds similar to AD823, i managed to burn this chip on the adaptor i forgot the chip is 2.5 - 5v rated, i see smoke from the op-amp when i placed it into my clone now the chip is in op-amp heaven but i hav 1 more left Share this post Link to post Share on other sites
heady 0 Report post Posted November 13, 2004 Sounds like the MAX chip is good for single 9V battery operation!! Wow, that's interesting. Is the power consumption low as well? Thanks. Share this post Link to post Share on other sites
bpribadi 0 Report post Posted November 13, 2004 There are some (a lot) good BB and AD chips specified for +/- 5 volts, they might be enough for 32 ohm headphone, but not high enough for 600 ohm headphone Share this post Link to post Share on other sites
tropicalrips 0 Report post Posted November 13, 2004 the MAX chip works well for single 9v amps, has 80mA output here's the site with the details MAXIM MAX4167 Share this post Link to post Share on other sites